> ## Documentation Index
> Fetch the complete documentation index at: https://signalschools.co.uk/docs/llms.txt
> Use this file to discover all available pages before exploring further.
# Custom Fields
> Configure custom fields that appear on incident forms based on categories, student groups, or student properties like SEN status and pupil premium.
Custom fields let you capture additional structured information when recording incidents. For example:
* A **Physical** category might require a field for "Type of restraint"
* You might want a "Witness present" yes/no field for all incidents involving a specific student group
* A "Referral outcome" dropdown for incidents involving pupil premium students
Custom fields are configured separately from categories. You create a **custom field configuration** that contains one or more fields, then set **criteria** to control when those fields appear on the incident form.
You need the **DSL** or **Owner** role to manage custom fields.
## How custom fields work
Each custom field configuration has:
* **A name** — to identify the configuration (e.g. "Physical Incident Fields")
* **One or more field definitions** — the actual fields that appear on the form (e.g. "Type of restraint", "Witness present")
* **Criteria** — conditions that determine when the fields appear (categories, student groups, SEN status, pupil premium)
When a staff member creates or edits an incident, the system checks which custom field configurations match based on the selected categories and the student's properties. All matching fields appear automatically on the form.
### Criteria matching
* **No criteria** means the fields appear on **every** incident of that type (student or staff)
* Criteria within the same type are combined with **OR** logic — e.g. if you select categories "Physical" and "Emotional", the fields appear for either category
* Criteria across different types are combined with **AND** logic — e.g. if you select category "Physical" and student group "Year 7", the fields only appear when both match
Staff incident custom fields only support category criteria. Student property criteria (student groups, SEN status, pupil premium) are only available for student incident fields.
## Setting up custom fields
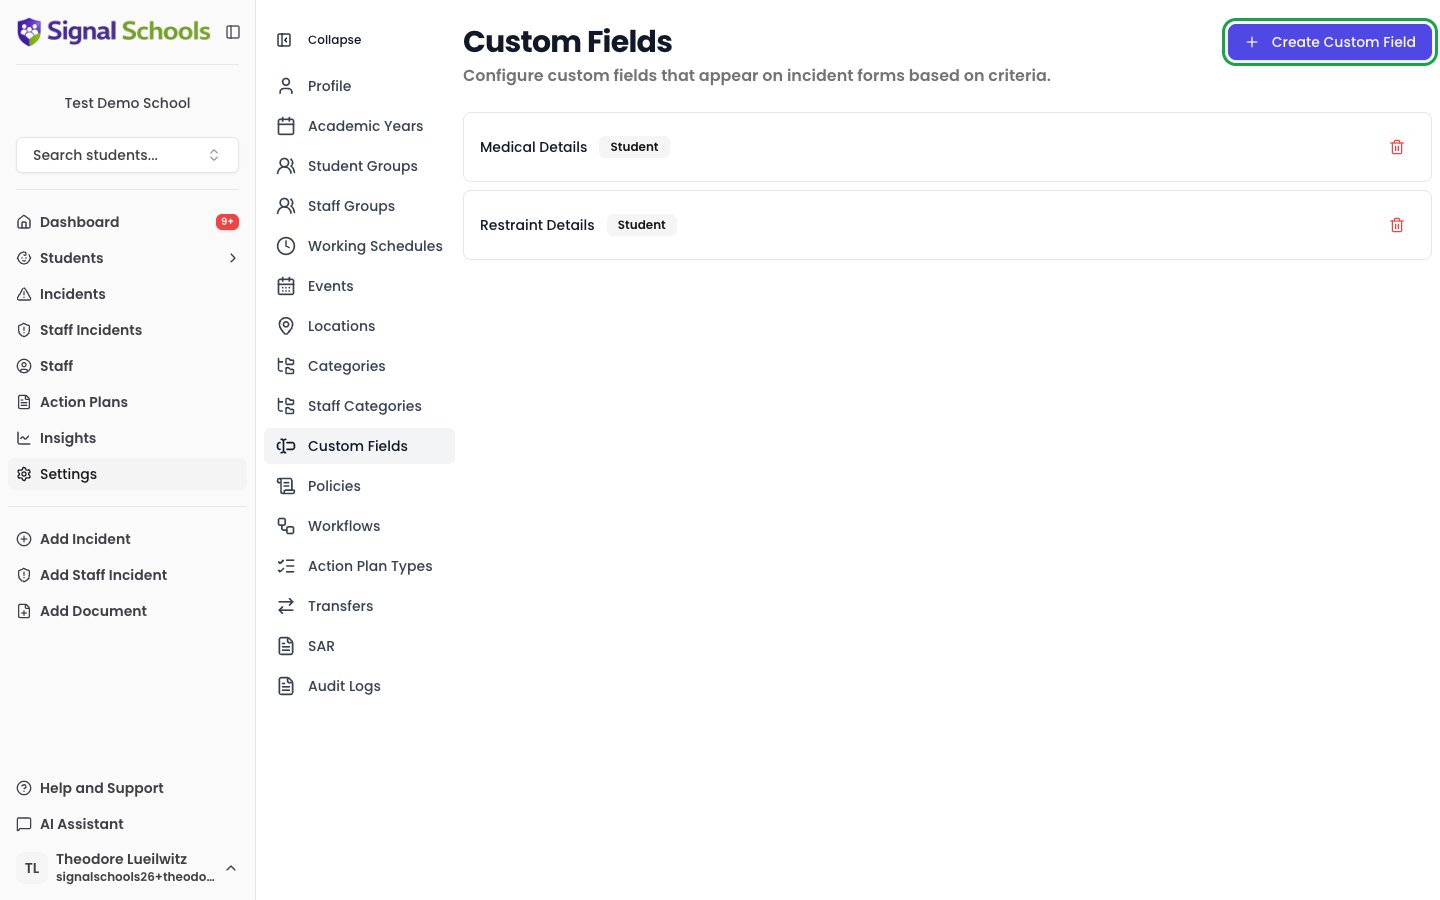
Go to **Settings > Custom Fields** to view and manage your custom field configurations.
 ### Creating a custom field configuration
### Create a new configuration
Click **Create Custom Field** to open the editor.
### Choose the incident type
Use the type dropdown in the editor to choose whether the fields apply to **Student Incidents** or **Staff Incidents**.
### Name the configuration
Give the configuration a name that describes its purpose (e.g. "Restraint Details", "Attendance Follow-up Fields").
### Add field definitions
Click **Add Field** to add one or more fields to the configuration. For each field, provide:
* **Field Name** — the label that appears on the incident form (e.g. "Type of restraint")
* **Field Type** — the kind of input:
* **Single Line Text** — a short text field
* **Multi-line Text** — a longer text area
* **Dropdown** — a single selection from a list of options
* **Multi Select** — multiple selections from a list of options
* **Yes / No** — a simple toggle
* **Required** — whether the field must be completed before submitting the incident
* **Guidance Text** — optional help text shown as a tooltip to help staff understand what to enter
* **Options** — for Dropdown and Multi Select types, type each option and press Enter to add it
### Set criteria
In the **Criteria** section of the editor, control when these fields appear. You can select:
* **Categories** — the fields appear when one of the selected categories is on the incident
* **Student Groups** — the fields appear when the student belongs to one of the selected groups (student incidents only)
* **SEN Status** — the fields appear when the student has the selected SEN status (student incidents only)
* **Pupil Premium** — the fields appear when the student is flagged as pupil premium (student incidents only)
Leave all criteria empty to make the fields appear on every incident.
### Save
Click **Create** to save the configuration. The fields will now appear on matching incidents. When editing an existing configuration, the button reads **Save Changes**.
### Editing and disabling
Click the edit button on any configuration to change its fields or criteria. When editing, you can also toggle the **Enabled** switch to disable the configuration — disabled configurations stop appearing on new incidents but existing incident data is preserved.
### Renaming fields and options
When you rename a field or one of its dropdown options, the new name applies everywhere — including on incidents recorded before the change. An incident recorded last term under "Ground hold" will show "Ground restraint" as soon as you rename that option.
This keeps your records consistent, so you are never left comparing old and new names for the same thing in reports.
If you want a genuinely different option rather than a corrected name, add a new option instead of renaming the existing one. Renaming rewrites the label on every past record that used it.
### Deleting and archiving
Click the delete button to remove a configuration. What happens next depends on whether the fields have been used:
* **Never used** — the configuration is deleted permanently.
* **Used on at least one incident** — the configuration is *archived* instead. It stops appearing on new incidents, but every incident that already has values keeps them, and those values stay visible and reportable.
Before deleting, the configuration screen shows how many incidents use each field and each dropdown option, so you can see what would be affected.
Archived configurations can be restored at any time, which makes their fields available on new incidents again.
Archiving is the safe choice when a field is no longer relevant going forward but you still need the history. Removing a single field from a configuration behaves the same way — it is archived if it has been used, deleted if it has not.
## Reporting on custom fields
Custom fields are not just a record — you can report on them.
On the [Insights](/docs/insights/overview) page you can group incidents by any dropdown, multi-select, or yes/no custom field. For example, group by "Hold Type" to see how many incidents involved each kind of physical intervention. Select any bar or segment to drill through to the matching incidents.
You can also ask the [AI assistant](/docs/ai-features/assistant) questions that use custom fields directly, such as "how many restraints used a ground hold this term?" or "what was the average duration recorded?" for number fields.
Free-text custom fields cannot be grouped or totalled, because every value is different. Use dropdowns or yes/no fields for anything you want to count or compare.
## Custom fields and AI analysis
Custom field values are automatically included when AI analyses an incident. This means the AI can take into account structured data like restraint type, referral outcome, or any other custom field when generating summaries, recommendations, and action plans.
## Custom fields in parent notifications
When configuring a [workflow](/docs/workflows/emails) with an **Email Parents** action, you can choose which custom field values to include in the parent notification email. This allows you to share relevant structured information with parents while keeping sensitive fields private.
## Viewing custom field values
When viewing an incident in detail, any custom field values recorded for that incident appear below the description. They are displayed as simple name-value pairs.
### Creating a custom field configuration
### Create a new configuration
Click **Create Custom Field** to open the editor.
### Choose the incident type
Use the type dropdown in the editor to choose whether the fields apply to **Student Incidents** or **Staff Incidents**.
### Name the configuration
Give the configuration a name that describes its purpose (e.g. "Restraint Details", "Attendance Follow-up Fields").
### Add field definitions
Click **Add Field** to add one or more fields to the configuration. For each field, provide:
* **Field Name** — the label that appears on the incident form (e.g. "Type of restraint")
* **Field Type** — the kind of input:
* **Single Line Text** — a short text field
* **Multi-line Text** — a longer text area
* **Dropdown** — a single selection from a list of options
* **Multi Select** — multiple selections from a list of options
* **Yes / No** — a simple toggle
* **Required** — whether the field must be completed before submitting the incident
* **Guidance Text** — optional help text shown as a tooltip to help staff understand what to enter
* **Options** — for Dropdown and Multi Select types, type each option and press Enter to add it
### Set criteria
In the **Criteria** section of the editor, control when these fields appear. You can select:
* **Categories** — the fields appear when one of the selected categories is on the incident
* **Student Groups** — the fields appear when the student belongs to one of the selected groups (student incidents only)
* **SEN Status** — the fields appear when the student has the selected SEN status (student incidents only)
* **Pupil Premium** — the fields appear when the student is flagged as pupil premium (student incidents only)
Leave all criteria empty to make the fields appear on every incident.
### Save
Click **Create** to save the configuration. The fields will now appear on matching incidents. When editing an existing configuration, the button reads **Save Changes**.
### Editing and disabling
Click the edit button on any configuration to change its fields or criteria. When editing, you can also toggle the **Enabled** switch to disable the configuration — disabled configurations stop appearing on new incidents but existing incident data is preserved.
### Renaming fields and options
When you rename a field or one of its dropdown options, the new name applies everywhere — including on incidents recorded before the change. An incident recorded last term under "Ground hold" will show "Ground restraint" as soon as you rename that option.
This keeps your records consistent, so you are never left comparing old and new names for the same thing in reports.
If you want a genuinely different option rather than a corrected name, add a new option instead of renaming the existing one. Renaming rewrites the label on every past record that used it.
### Deleting and archiving
Click the delete button to remove a configuration. What happens next depends on whether the fields have been used:
* **Never used** — the configuration is deleted permanently.
* **Used on at least one incident** — the configuration is *archived* instead. It stops appearing on new incidents, but every incident that already has values keeps them, and those values stay visible and reportable.
Before deleting, the configuration screen shows how many incidents use each field and each dropdown option, so you can see what would be affected.
Archived configurations can be restored at any time, which makes their fields available on new incidents again.
Archiving is the safe choice when a field is no longer relevant going forward but you still need the history. Removing a single field from a configuration behaves the same way — it is archived if it has been used, deleted if it has not.
## Reporting on custom fields
Custom fields are not just a record — you can report on them.
On the [Insights](/docs/insights/overview) page you can group incidents by any dropdown, multi-select, or yes/no custom field. For example, group by "Hold Type" to see how many incidents involved each kind of physical intervention. Select any bar or segment to drill through to the matching incidents.
You can also ask the [AI assistant](/docs/ai-features/assistant) questions that use custom fields directly, such as "how many restraints used a ground hold this term?" or "what was the average duration recorded?" for number fields.
Free-text custom fields cannot be grouped or totalled, because every value is different. Use dropdowns or yes/no fields for anything you want to count or compare.
## Custom fields and AI analysis
Custom field values are automatically included when AI analyses an incident. This means the AI can take into account structured data like restraint type, referral outcome, or any other custom field when generating summaries, recommendations, and action plans.
## Custom fields in parent notifications
When configuring a [workflow](/docs/workflows/emails) with an **Email Parents** action, you can choose which custom field values to include in the parent notification email. This allows you to share relevant structured information with parents while keeping sensitive fields private.
## Viewing custom field values
When viewing an incident in detail, any custom field values recorded for that incident appear below the description. They are displayed as simple name-value pairs.