> ## Documentation Index
> Fetch the complete documentation index at: https://signalschools.co.uk/docs/llms.txt
> Use this file to discover all available pages before exploring further.
# Managing Incidents
> Search, filter, view, edit, and manage safeguarding incidents in Signal. Learn about edit history, visibility exclusions, and document management.
Once incidents are recorded, you need to find them, review them, and keep them up to date. Signal provides powerful tools for searching, filtering, and managing your incident records.
 ## Viewing the incident list
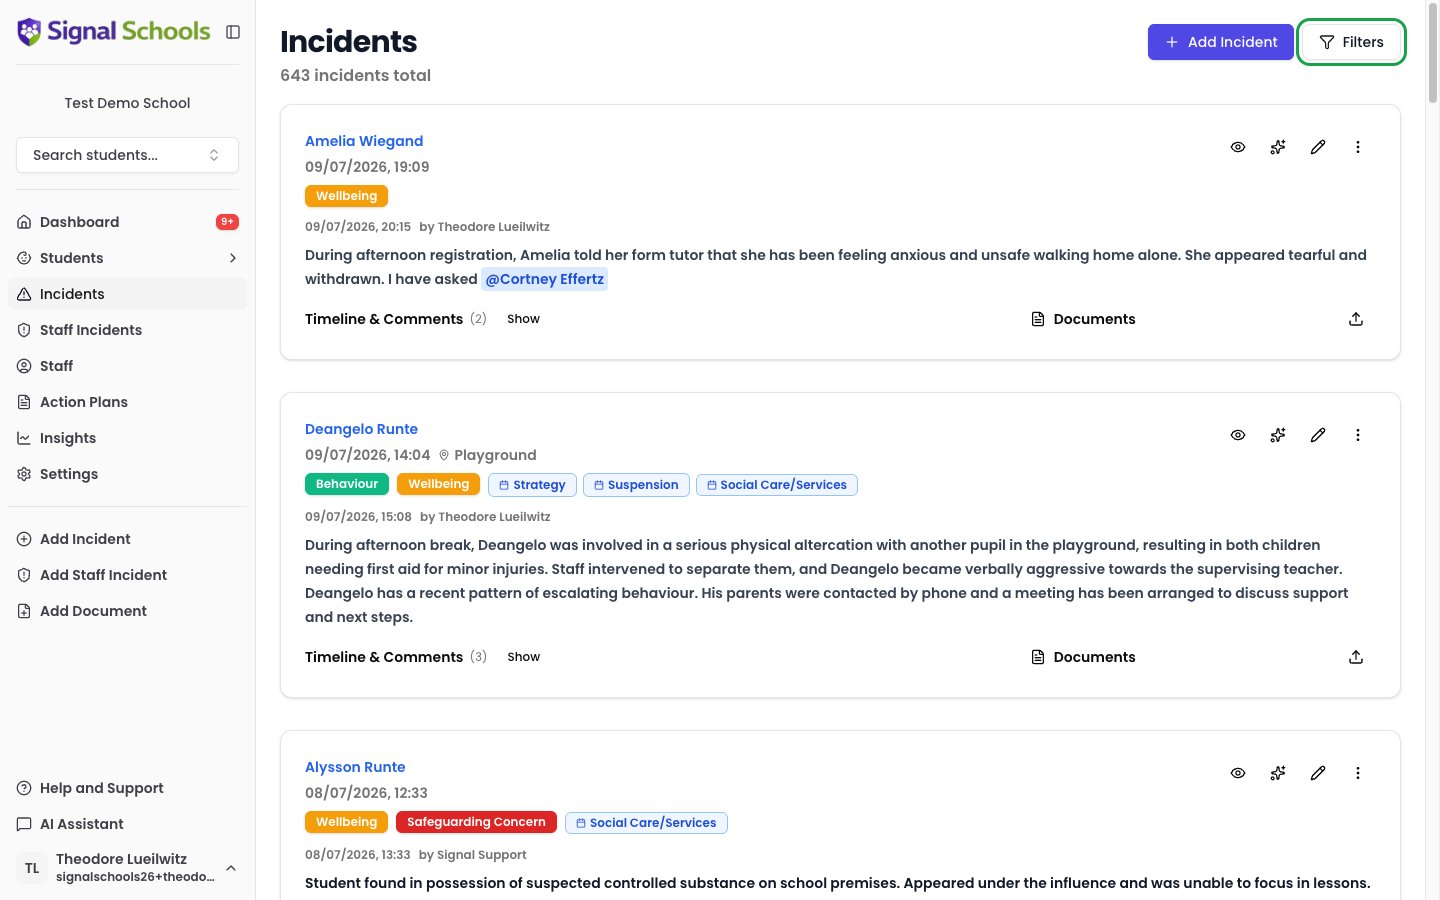
The incident list shows all student incidents you have access to. You can find it by clicking **Incidents** in the sidebar navigation.
### Searching
Use the search bar at the top of the incident list to find specific incidents. You can search by student name, keywords in the description, or other details.
### Filtering
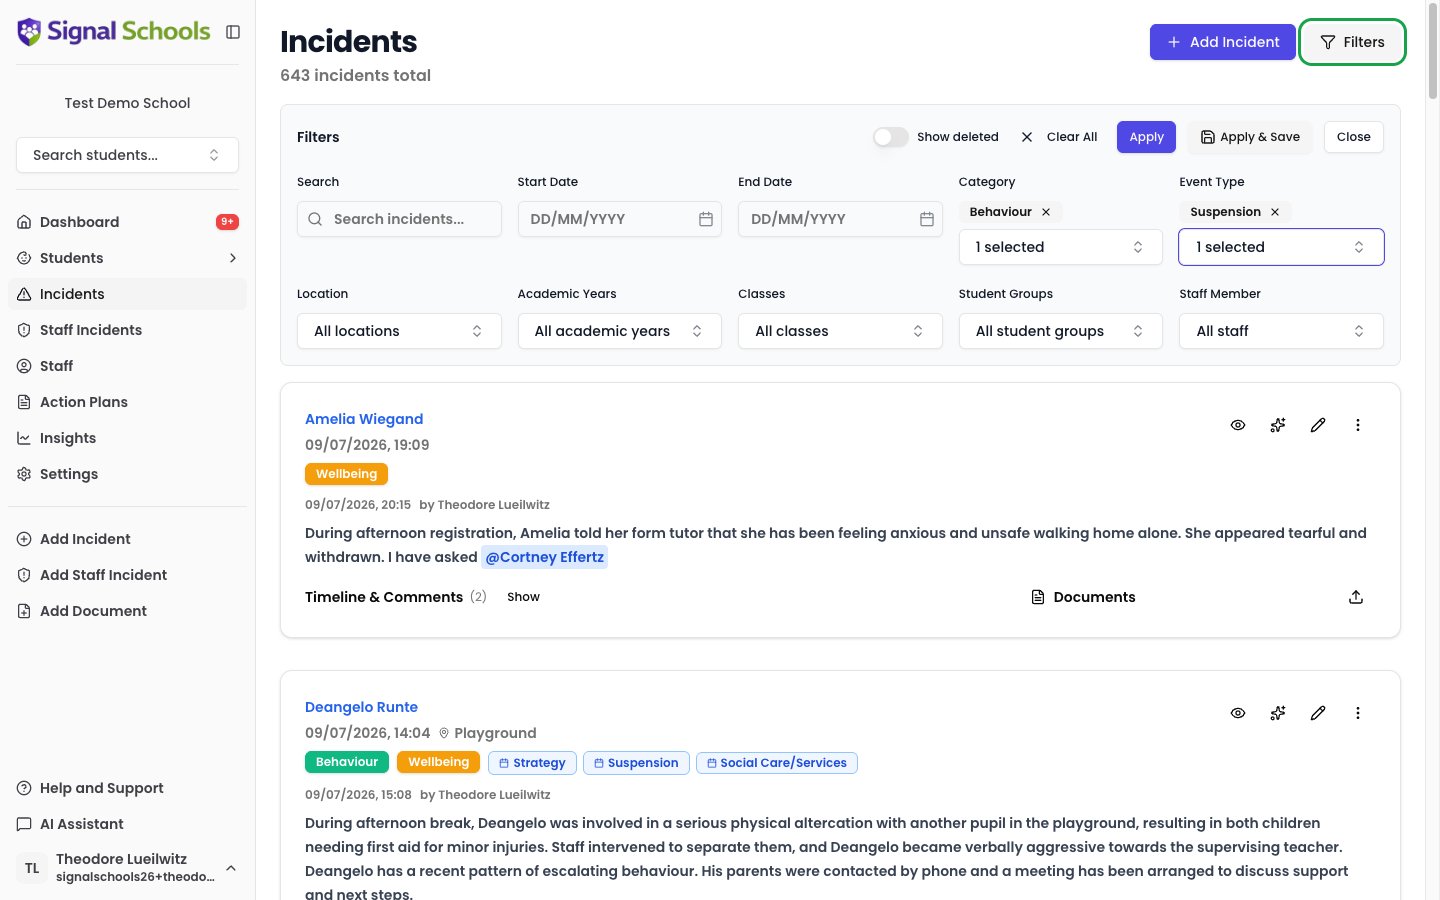
Narrow down the list using filters. You can filter by:
* **Search** — match student name, keywords, or other details
* **Start Date** and **End Date** — show incidents from a specific time period
* **Categories** — show only incidents of specific concern types
* **Event Types** — show incidents linked to specific event types
* **Location** — show incidents that occurred at a particular location
* **Academic Year** — show incidents from a specific academic year
* **Class** — show incidents for students in a particular class
* **Student Groups** — show incidents for students in specific groups
* **Staff Member** — show incidents involving a particular staff member
* **Include Deleted** — include deleted incidents in the results
Filters can be combined to get exactly the view you need. For example, you might filter for all Physical incidents at the Playground in the last term.
## Viewing the incident list
The incident list shows all student incidents you have access to. You can find it by clicking **Incidents** in the sidebar navigation.
### Searching
Use the search bar at the top of the incident list to find specific incidents. You can search by student name, keywords in the description, or other details.
### Filtering
Narrow down the list using filters. You can filter by:
* **Search** — match student name, keywords, or other details
* **Start Date** and **End Date** — show incidents from a specific time period
* **Categories** — show only incidents of specific concern types
* **Event Types** — show incidents linked to specific event types
* **Location** — show incidents that occurred at a particular location
* **Academic Year** — show incidents from a specific academic year
* **Class** — show incidents for students in a particular class
* **Student Groups** — show incidents for students in specific groups
* **Staff Member** — show incidents involving a particular staff member
* **Include Deleted** — include deleted incidents in the results
Filters can be combined to get exactly the view you need. For example, you might filter for all Physical incidents at the Playground in the last term.
 ## The incident card
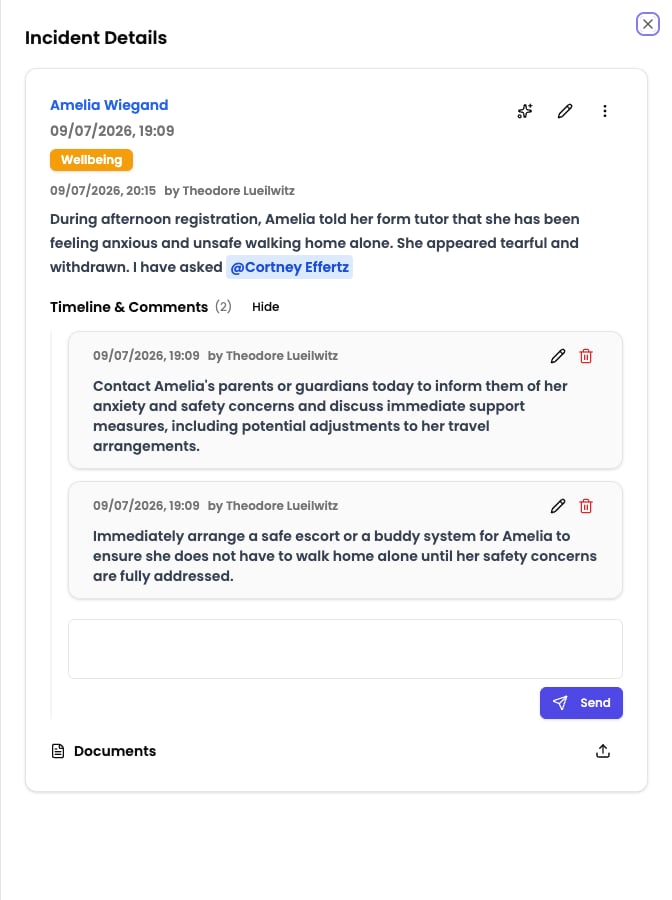
Click any incident in the list to open its detail view. The incident card is the primary way to view and interact with an incident. It shows all information about the concern and provides actions for follow-up.
## The incident card
Click any incident in the list to open its detail view. The incident card is the primary way to view and interact with an incident. It shows all information about the concern and provides actions for follow-up.
 ### What you see on the incident card
Each incident card displays:
* **Students** — the main student(s) and any linked students
* **Date and time** of the incident
* **Location** and **agency** badges (if applicable)
* **Description** — the full incident description with any @mentions
* **Creation and edit metadata** — who created it, when, and whether it has been edited
### Shared incident history
When an incident involves two or more students, a small chart icon appears beside the student names. Click it to see how often those same children have appeared in incidents **together** in the past, plotted month by month.
This answers a question that is otherwise slow to check: is this a one-off between these pupils, or part of a pattern? A history that is scattered across a couple of months reads very differently from one that has been building steadily all year.
### What you see on the incident card
Each incident card displays:
* **Students** — the main student(s) and any linked students
* **Date and time** of the incident
* **Location** and **agency** badges (if applicable)
* **Description** — the full incident description with any @mentions
* **Creation and edit metadata** — who created it, when, and whether it has been edited
### Shared incident history
When an incident involves two or more students, a small chart icon appears beside the student names. Click it to see how often those same children have appeared in incidents **together** in the past, plotted month by month.
This answers a question that is otherwise slow to check: is this a one-off between these pupils, or part of a pattern? A history that is scattered across a couple of months reads very differently from one that has been building steadily all year.
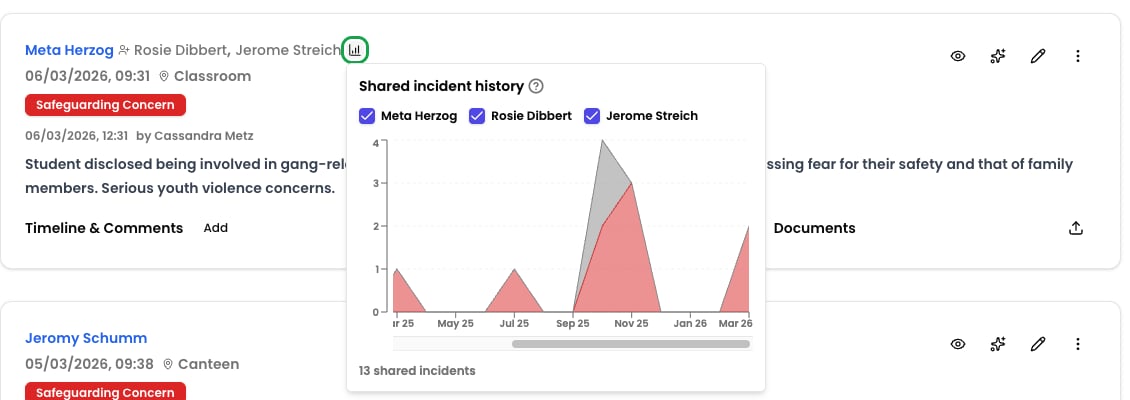 * Each month's column or band is broken down by **category**, using your school's category colours, so you can see whether the shared history is all one type of concern or a mix.
* Hover over any month to see the exact number of shared incidents and which categories they fall under.
* The chart scrolls sideways when the history is long, and opens on the most recent months.
* A short history is shown as bars; once there are enough shared incidents to show a trend, Signal switches to a filled area chart.
* The count beneath the chart tells you how many shared incidents it is based on.
If the incident involves three or more students, tick boxes appear above the chart. Every student starts ticked, and the chart shows only incidents involving **all** of the ticked children together. Untick a pupil to widen the search to the remaining pupils — useful when you want to check whether two of the group have a longer history with each other than the group as a whole.
The chart only counts incidents where the ticked pupils appear **together**. It is not a history of each child individually — for that, use the student's [profile timeline](/docs/students/profile-timeline).
### AI Summary
If Signal has generated a summary for the incident, it appears in a collapsible **AI Summary** section. This provides a concise overview of the concern and any patterns identified.
### Short Term Actions
Click **Create Short Term Actions** on the incident card to generate AI-powered recommendations. Signal analyses the incident description, student history, and relevant policies to suggest practical next steps. These recommendations can be reviewed, edited, and saved as comments on the incident.
Short Term Actions are generated on demand — click the button when you want recommendations. They are not created automatically.
### Relevant Policies
The incident card shows which safeguarding policies are relevant to this concern. Policies matched by AI are highlighted, while manually linked policies are shown separately. Click a policy to view the full document.
### Linked Action Plans
If the incident is linked to any action plans, they appear as badges on the card. Click an action plan badge to navigate to the plan detail page.
### Action buttons
The incident card provides several actions. Some sit directly on the card, while others are grouped under the **More actions** (⋮) menu:
| Action | What it does |
| ----------------------------- | ------------------------------------------------- |
| **View** | Opens the full incident detail |
| **Create Short Term Actions** | Generates AI-powered recommendations |
| **Create Plan** | Creates a new action plan linked to this incident |
| **Add to Existing Plan** | Links this incident to an existing action plan |
| **Record Event** | Records an event against this incident |
| **Create Reminder** | Sets a reminder linked to this incident |
| **Edit** | Opens the incident for editing |
| **Delete Incident** | Permanently removes the incident |
On desktop, **Create Plan**, **Record Event**, **Create Reminder**, and **Delete Incident** are found in the **More actions** (⋮) menu on the incident card.
### Comments and documents
The bottom of the incident card shows the **comments** section and **documents** section side by side. You can add comments with @mentions, upload new documents, and view existing attachments directly from the card.
## Editing incidents
You can edit an incident to update its details as the situation develops. Open the incident and click **Edit** to modify:
* The description
* Categories
* Location
* Agencies
* Staff present
* Linked students
* Attached documents
You need the **Owner**, **DSL**, or **Deputy DSL** role to edit incidents.
### Edit history
Signal tracks every change made to an incident. Each edit is recorded with the name of the person who made it and a timestamp. This ensures full accountability and means you can always see how a record has evolved over time.
The edit history is visible on the incident detail view, so anyone reviewing the incident can see what was changed and when.
## Visibility exclusions
Only users with the **Owner**, **DSL**, or **Deputy DSL** role can set or change visibility exclusions.
Visibility exclusions control which staff members can see a specific incident. Open **Manage Visibility** on the incident to set them — you can restrict to DSLs only, exclude individual staff, or exclude whole Staff Groups. You can set exclusions when creating an incident or edit them afterwards.
This is one of three ways to control who can see safeguarding records, alongside student restrictions and workflow exclusions. For the full picture — how per-incident settings interact with your school's [workflow rules](/docs/workflows/student-restrictions), and how to hand control back with **Reset to workflow rules** — see [Managing incident visibility](/docs/incidents/managing-visibility).
## Marking incidents as viewed
When you open an incident you have not seen before, Signal marks it as viewed. This helps track which incidents you have reviewed and which are new to you.
## Deleting incidents
You need the **Deputy DSL**, **DSL**, or **Owner** role to delete incidents.
In rare cases, you may need to delete an incident — for example, if it was created in error or contains duplicate information.
Deleting an incident removes it permanently. Consider whether editing the incident or adding a clarifying comment would be more appropriate before deleting. In safeguarding, it is generally better to keep a record and annotate it than to delete it entirely.
## Document management
### Uploading documents
You can attach documents to an incident at any time — both during creation and afterwards. Click the document upload area on the incident to add files such as photos, reports, letters, or screenshots.
### Viewing documents
Attached documents appear on the incident detail view. Click a document to view or download it.
### Removing documents
If a document was attached in error, you can remove it from the incident. Removing a document detaches it from the incident.
Keep incident records as complete and accurate as possible. If you realise something has changed or was incorrect, add a comment explaining the update rather than silently editing or deleting information. A transparent record is always stronger than one that has been quietly altered.
* Each month's column or band is broken down by **category**, using your school's category colours, so you can see whether the shared history is all one type of concern or a mix.
* Hover over any month to see the exact number of shared incidents and which categories they fall under.
* The chart scrolls sideways when the history is long, and opens on the most recent months.
* A short history is shown as bars; once there are enough shared incidents to show a trend, Signal switches to a filled area chart.
* The count beneath the chart tells you how many shared incidents it is based on.
If the incident involves three or more students, tick boxes appear above the chart. Every student starts ticked, and the chart shows only incidents involving **all** of the ticked children together. Untick a pupil to widen the search to the remaining pupils — useful when you want to check whether two of the group have a longer history with each other than the group as a whole.
The chart only counts incidents where the ticked pupils appear **together**. It is not a history of each child individually — for that, use the student's [profile timeline](/docs/students/profile-timeline).
### AI Summary
If Signal has generated a summary for the incident, it appears in a collapsible **AI Summary** section. This provides a concise overview of the concern and any patterns identified.
### Short Term Actions
Click **Create Short Term Actions** on the incident card to generate AI-powered recommendations. Signal analyses the incident description, student history, and relevant policies to suggest practical next steps. These recommendations can be reviewed, edited, and saved as comments on the incident.
Short Term Actions are generated on demand — click the button when you want recommendations. They are not created automatically.
### Relevant Policies
The incident card shows which safeguarding policies are relevant to this concern. Policies matched by AI are highlighted, while manually linked policies are shown separately. Click a policy to view the full document.
### Linked Action Plans
If the incident is linked to any action plans, they appear as badges on the card. Click an action plan badge to navigate to the plan detail page.
### Action buttons
The incident card provides several actions. Some sit directly on the card, while others are grouped under the **More actions** (⋮) menu:
| Action | What it does |
| ----------------------------- | ------------------------------------------------- |
| **View** | Opens the full incident detail |
| **Create Short Term Actions** | Generates AI-powered recommendations |
| **Create Plan** | Creates a new action plan linked to this incident |
| **Add to Existing Plan** | Links this incident to an existing action plan |
| **Record Event** | Records an event against this incident |
| **Create Reminder** | Sets a reminder linked to this incident |
| **Edit** | Opens the incident for editing |
| **Delete Incident** | Permanently removes the incident |
On desktop, **Create Plan**, **Record Event**, **Create Reminder**, and **Delete Incident** are found in the **More actions** (⋮) menu on the incident card.
### Comments and documents
The bottom of the incident card shows the **comments** section and **documents** section side by side. You can add comments with @mentions, upload new documents, and view existing attachments directly from the card.
## Editing incidents
You can edit an incident to update its details as the situation develops. Open the incident and click **Edit** to modify:
* The description
* Categories
* Location
* Agencies
* Staff present
* Linked students
* Attached documents
You need the **Owner**, **DSL**, or **Deputy DSL** role to edit incidents.
### Edit history
Signal tracks every change made to an incident. Each edit is recorded with the name of the person who made it and a timestamp. This ensures full accountability and means you can always see how a record has evolved over time.
The edit history is visible on the incident detail view, so anyone reviewing the incident can see what was changed and when.
## Visibility exclusions
Only users with the **Owner**, **DSL**, or **Deputy DSL** role can set or change visibility exclusions.
Visibility exclusions control which staff members can see a specific incident. Open **Manage Visibility** on the incident to set them — you can restrict to DSLs only, exclude individual staff, or exclude whole Staff Groups. You can set exclusions when creating an incident or edit them afterwards.
This is one of three ways to control who can see safeguarding records, alongside student restrictions and workflow exclusions. For the full picture — how per-incident settings interact with your school's [workflow rules](/docs/workflows/student-restrictions), and how to hand control back with **Reset to workflow rules** — see [Managing incident visibility](/docs/incidents/managing-visibility).
## Marking incidents as viewed
When you open an incident you have not seen before, Signal marks it as viewed. This helps track which incidents you have reviewed and which are new to you.
## Deleting incidents
You need the **Deputy DSL**, **DSL**, or **Owner** role to delete incidents.
In rare cases, you may need to delete an incident — for example, if it was created in error or contains duplicate information.
Deleting an incident removes it permanently. Consider whether editing the incident or adding a clarifying comment would be more appropriate before deleting. In safeguarding, it is generally better to keep a record and annotate it than to delete it entirely.
## Document management
### Uploading documents
You can attach documents to an incident at any time — both during creation and afterwards. Click the document upload area on the incident to add files such as photos, reports, letters, or screenshots.
### Viewing documents
Attached documents appear on the incident detail view. Click a document to view or download it.
### Removing documents
If a document was attached in error, you can remove it from the incident. Removing a document detaches it from the incident.
Keep incident records as complete and accurate as possible. If you realise something has changed or was incorrect, add a comment explaining the update rather than silently editing or deleting information. A transparent record is always stronger than one that has been quietly altered.