> ## Documentation Index
> Fetch the complete documentation index at: https://signalschools.co.uk/docs/llms.txt
> Use this file to discover all available pages before exploring further.
# Adding & Editing Students
> Learn how to add students to Signal manually or through MIS sync. Edit details, manage contacts, and archive student records.
Adding and editing students requires the **Owner** or **Admin** role. If you do not see these options, check your role with your school's Signal administrator.
There are two ways to add students to Signal: manual entry and automatic sync from your MIS. You can also edit student details, manage contacts, and archive students who have left.
## Two ways to add students
Add students one at a time using the form. Best for individual additions or corrections.
Automatically sync students from Arbor. The easiest option if your school uses a supported MIS.
## Adding a student manually
Navigate to **Students** from the sidebar.
Select the **Add Student** button at the top of the student list.
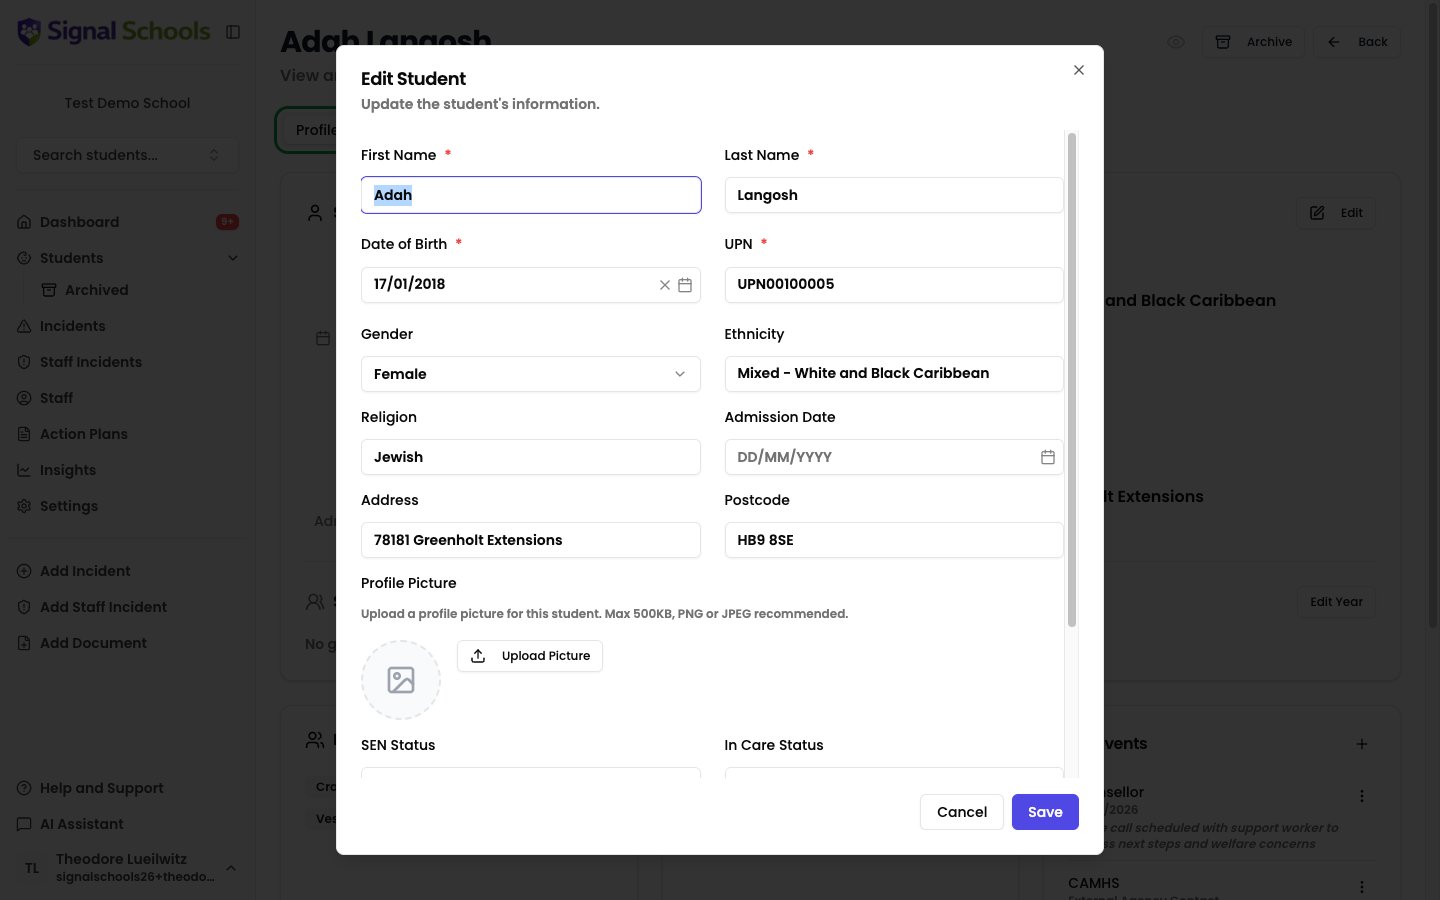
Fill in the required fields:
* **First name** and **last name**
* **Date of birth**
* **UPN** (Unique Pupil Number)
* **Year group** and **class**
* **Gender**
* **Ethnicity**
* **Religion**
* **Admission date**
* **Address** and **postcode**
* **SEN status** (whether the student has Special Educational Needs)
* **Pupil Premium** (whether the student is eligible for Pupil Premium)
* **In care status** (fostered, children's home, adopted, or other care arrangements)
* **Pre-admission** flag (if the student has not yet started at your school)
* **Profile picture** (optional)
Click **Save** to create the student record.
 ## Adding contacts and guardians
Once a student record exists, you can add their parents, carers, or other guardians.
Navigate to the student's profile page by clicking their name in the student list.
Select the **Contacts** tab on the student's profile.
Select **Add Contact** and enter the guardian's details — name, relationship to the student, phone number, and email address.
Click **Save** to link the contact to the student.
If your school is connected to Arbor, contact information is synced automatically. You only need to add contacts manually if they are missing from your MIS or if you do not use MIS sync.
## MIS sync
If your school uses Arbor, students can be synced automatically. This is the easiest way to keep your student list up to date — names, dates of birth, UPNs, year groups, classes, and contact details are all imported and kept in sync on a regular schedule.
To set up MIS sync, see [MIS Integration](/docs/getting-started/mis-integration).
When MIS sync is active, changes made in Arbor are reflected in Signal automatically. You can still edit student details manually in Signal, but synced fields will be overwritten on the next sync.
## Editing student details
Use the search bar on the **Students** page, or browse the student list.
Click on the student's name to open their profile page.
Update any fields as needed — personal details, year group, class, SEN status, or Pupil Premium eligibility.
Click **Save** to apply your changes.
## Archiving students
When a student leaves your school, you can archive their record rather than deleting it. Archiving removes the student from active lists while preserving their full safeguarding history — all incidents, documents, comments, and action plans remain intact.
Archived records are still available for transfers to other schools or subject access requests.
Navigate to the student you want to archive.
Click **Archive** and confirm the action.
Archive a student when they have left your school permanently — for example, when they transfer to another school, finish their final year, or are permanently excluded. Do not archive students who are temporarily absent.
Yes. Archived students are listed under **Students → Archived**, a separate route in the sidebar. Their full history remains accessible to staff with the appropriate role.
## Viewing archived students
Archived students are not shown in your active student list. To find them, open **Students → Archived** from the sidebar. From there you can search for or browse to any archived student and open their profile to view their full safeguarding history.
Archiving a student does not delete their record — all previous incidents, documents, and action plans remain linked and can still be viewed under **Students → Archived**.
## Adding contacts and guardians
Once a student record exists, you can add their parents, carers, or other guardians.
Navigate to the student's profile page by clicking their name in the student list.
Select the **Contacts** tab on the student's profile.
Select **Add Contact** and enter the guardian's details — name, relationship to the student, phone number, and email address.
Click **Save** to link the contact to the student.
If your school is connected to Arbor, contact information is synced automatically. You only need to add contacts manually if they are missing from your MIS or if you do not use MIS sync.
## MIS sync
If your school uses Arbor, students can be synced automatically. This is the easiest way to keep your student list up to date — names, dates of birth, UPNs, year groups, classes, and contact details are all imported and kept in sync on a regular schedule.
To set up MIS sync, see [MIS Integration](/docs/getting-started/mis-integration).
When MIS sync is active, changes made in Arbor are reflected in Signal automatically. You can still edit student details manually in Signal, but synced fields will be overwritten on the next sync.
## Editing student details
Use the search bar on the **Students** page, or browse the student list.
Click on the student's name to open their profile page.
Update any fields as needed — personal details, year group, class, SEN status, or Pupil Premium eligibility.
Click **Save** to apply your changes.
## Archiving students
When a student leaves your school, you can archive their record rather than deleting it. Archiving removes the student from active lists while preserving their full safeguarding history — all incidents, documents, comments, and action plans remain intact.
Archived records are still available for transfers to other schools or subject access requests.
Navigate to the student you want to archive.
Click **Archive** and confirm the action.
Archive a student when they have left your school permanently — for example, when they transfer to another school, finish their final year, or are permanently excluded. Do not archive students who are temporarily absent.
Yes. Archived students are listed under **Students → Archived**, a separate route in the sidebar. Their full history remains accessible to staff with the appropriate role.
## Viewing archived students
Archived students are not shown in your active student list. To find them, open **Students → Archived** from the sidebar. From there you can search for or browse to any archived student and open their profile to view their full safeguarding history.
Archiving a student does not delete their record — all previous incidents, documents, and action plans remain linked and can still be viewed under **Students → Archived**.