> ## Documentation Index
> Fetch the complete documentation index at: https://signalschools.co.uk/docs/llms.txt
> Use this file to discover all available pages before exploring further.
# Creating a Transfer
> Step-by-step guide to sending outgoing transfers and requesting incoming transfers for safeguarding records.
You need to be **Deputy DSL** or above, or hold the **School Admin** role, to create transfers.
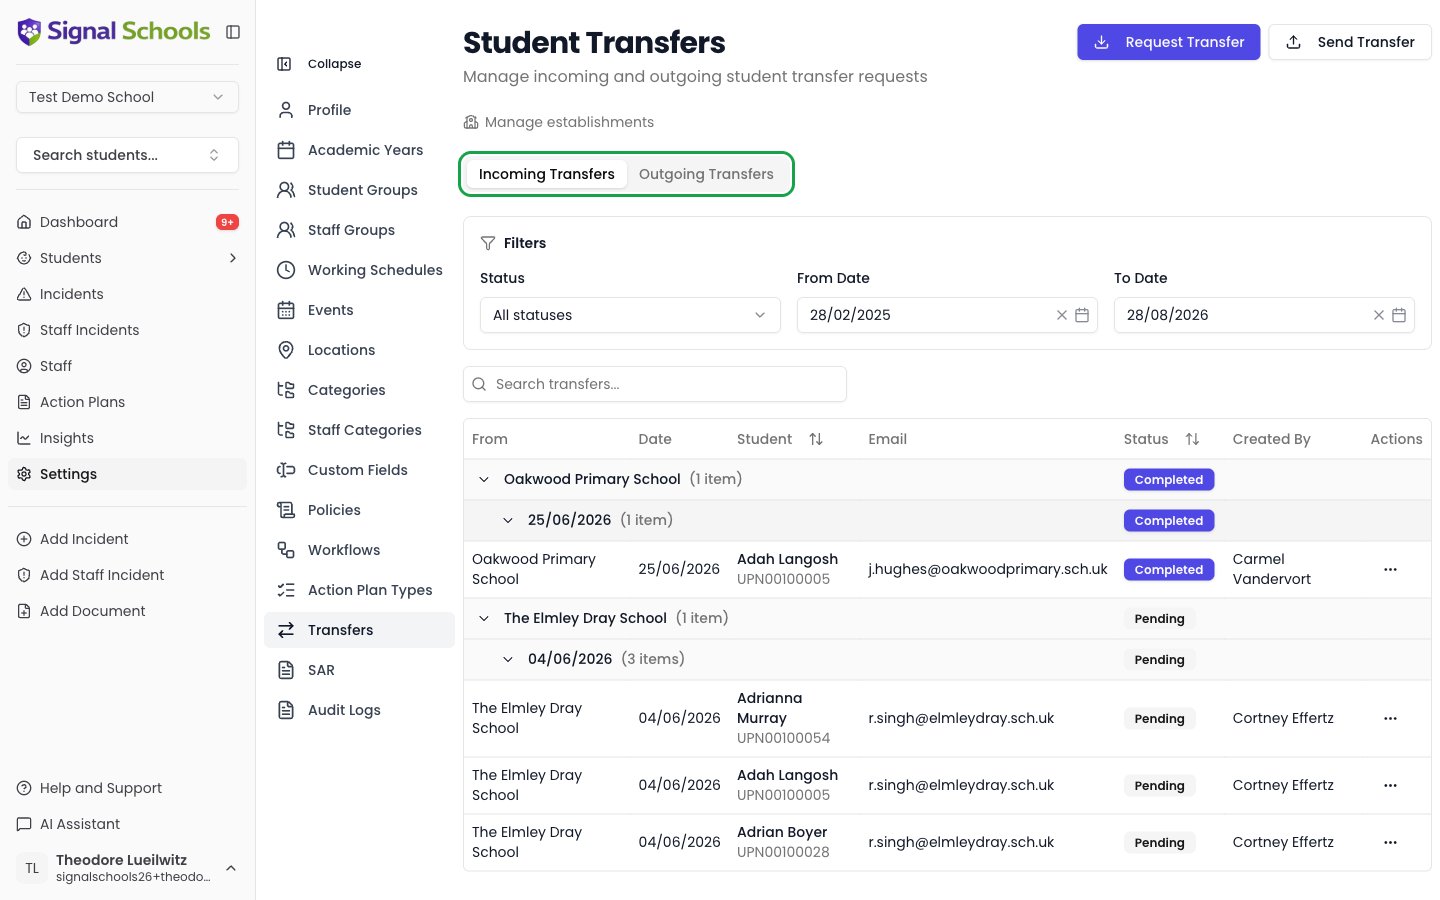
Signal supports two transfer flows, both initiated from **Settings > Transfers**. Use **Send Transfer** when a student is leaving your school, and **Request Transfer** when a student has arrived and you need their records from a previous school.
Both flows require you to select an establishment from your directory — or create a new one during the process.
 ## Send Transfer (outgoing)
Use this flow when a student is leaving your school and you need to send their safeguarding records to the receiving school.
### When to send a transfer
* A student is moving to another school (primary to secondary, or any school change)
* A student is transferring to a pupil referral unit (PRU) or alternative provision
* A student is moving to a school in another local authority
You should initiate the transfer as soon as you know the student is leaving, so records arrive before or shortly after the child does.
### Steps
You can only send records for an **archived** student. Archive the pupil on their profile first — see [Archiving students](/docs/students/adding-editing#archiving-students). If none of your pupils are archived, the student picker is empty.
Go to **Settings > Transfers** and click **Send Transfer**.
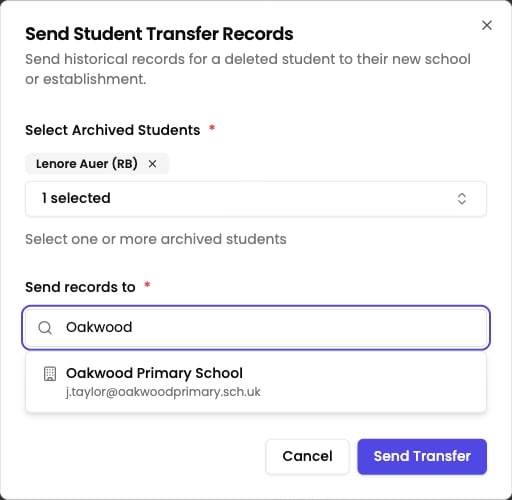
In **Select Archived Students**, search for and choose the pupil whose records you are sending. You can select more than one — useful when siblings move together.
Under **Send records to**, start typing the receiving school's name and pick it from your [establishments directory](/docs/transfers/managing-transfers). If it is not there yet, click **Add new establishment** — or **Can't find it? Add establishment manually** to enter the name and email yourself.
Click **Send Transfer**. The receiving school is emailed to say records are waiting for them, and the transfer appears on your **Outgoing Transfers** tab so you can track it. If they do not use Signal, see [what they receive](/docs/transfers/schools-without-signal).
## Send Transfer (outgoing)
Use this flow when a student is leaving your school and you need to send their safeguarding records to the receiving school.
### When to send a transfer
* A student is moving to another school (primary to secondary, or any school change)
* A student is transferring to a pupil referral unit (PRU) or alternative provision
* A student is moving to a school in another local authority
You should initiate the transfer as soon as you know the student is leaving, so records arrive before or shortly after the child does.
### Steps
You can only send records for an **archived** student. Archive the pupil on their profile first — see [Archiving students](/docs/students/adding-editing#archiving-students). If none of your pupils are archived, the student picker is empty.
Go to **Settings > Transfers** and click **Send Transfer**.
In **Select Archived Students**, search for and choose the pupil whose records you are sending. You can select more than one — useful when siblings move together.
Under **Send records to**, start typing the receiving school's name and pick it from your [establishments directory](/docs/transfers/managing-transfers). If it is not there yet, click **Add new establishment** — or **Can't find it? Add establishment manually** to enter the name and email yourself.
Click **Send Transfer**. The receiving school is emailed to say records are waiting for them, and the transfer appears on your **Outgoing Transfers** tab so you can track it. If they do not use Signal, see [what they receive](/docs/transfers/schools-without-signal).
 ## Request Transfer (incoming)
Use this flow when a student has arrived at your school and you need to request their safeguarding records from their previous school.
### When to request a transfer
* A new student has joined your school and you need their safeguarding history
* A student has transferred from another setting and records have not yet been provided
* You need to follow up on records that should have accompanied a student on arrival
### Steps
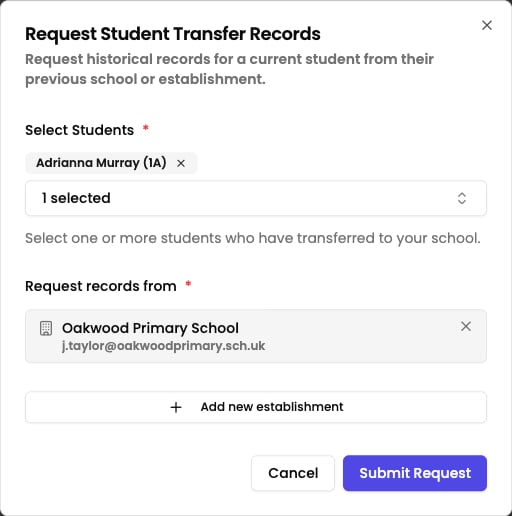
Go to **Settings > Transfers** and click **Request Transfer**. Select the student whose records you need.
Choose the student's previous school from your [establishments directory](/docs/transfers/managing-transfers), or click **Add new establishment** to create one. You can search for the school to prepopulate the details, or enter them manually.
Confirm and send. The previous school is notified by email that you have requested safeguarding records for the student. Send it to a mailbox someone monitors — the sign-in code goes to that same address. See [Schools Without Signal](/docs/transfers/schools-without-signal).
## Request Transfer (incoming)
Use this flow when a student has arrived at your school and you need to request their safeguarding records from their previous school.
### When to request a transfer
* A new student has joined your school and you need their safeguarding history
* A student has transferred from another setting and records have not yet been provided
* You need to follow up on records that should have accompanied a student on arrival
### Steps
Go to **Settings > Transfers** and click **Request Transfer**. Select the student whose records you need.
Choose the student's previous school from your [establishments directory](/docs/transfers/managing-transfers), or click **Add new establishment** to create one. You can search for the school to prepopulate the details, or enter them manually.
Confirm and send. The previous school is notified by email that you have requested safeguarding records for the student. Send it to a mailbox someone monitors — the sign-in code goes to that same address. See [Schools Without Signal](/docs/transfers/schools-without-signal).
 Once the previous school responds, the incoming transfer appears on your Transfers page for you to review and accept.
## What gets included
A transfer sends the student's safeguarding record across, which can include:
* **Incidents** — the full incident record, including description, categories, date, and any linked information.
* **Comments** — comments on those incidents, preserving the communication trail.
* **Documents** — files from the student's document library and attachments on their incidents.
* **Context** — additional context about the student's situation.
Start building your [establishments directory](/docs/transfers/managing-transfers) early. Adding the schools you commonly transfer to or receive from saves time when you need to create a transfer quickly.
Check the pupil and the receiving school carefully before you click **Send Transfer**. Once sent, the receiving school is emailed and can access the records.
Once the previous school responds, the incoming transfer appears on your Transfers page for you to review and accept.
## What gets included
A transfer sends the student's safeguarding record across, which can include:
* **Incidents** — the full incident record, including description, categories, date, and any linked information.
* **Comments** — comments on those incidents, preserving the communication trail.
* **Documents** — files from the student's document library and attachments on their incidents.
* **Context** — additional context about the student's situation.
Start building your [establishments directory](/docs/transfers/managing-transfers) early. Adding the schools you commonly transfer to or receive from saves time when you need to create a transfer quickly.
Check the pupil and the receiving school carefully before you click **Send Transfer**. Once sent, the receiving school is emailed and can access the records.