> ## Documentation Index
> Fetch the complete documentation index at: https://signalschools.co.uk/docs/llms.txt
> Use this file to discover all available pages before exploring further.
# Workflows
> Automate your school's safeguarding response with workflows. Define triggers based on incident criteria and set up actions to alert staff, email parents, or restrict visibility — all without manual follow-up.
Workflows are the engine behind Signal's automated safeguarding response. They remove the need for manual follow-up by automatically taking action when incidents are recorded — alerting the right staff, notifying parents, or restricting who can see sensitive cases.
Instead of relying on someone to remember to notify the pastoral team, email a parent, or lock down a sensitive incident, workflows handle it instantly and consistently every time.
 You need to be a **Deputy DSL** or above to create, edit, or delete workflows.
## How workflows work
Each workflow has two parts:
1. **Trigger** — the condition that determines when the workflow fires
2. **Actions** — what happens when the trigger matches
When a new incident is created, Signal evaluates all enabled workflows. If an incident matches a workflow's trigger criteria, the workflow's actions run automatically. This happens every time an incident is saved — you do not need to take any action to start the process.
## Trigger
Each workflow has a single **Trigger**. You pick one of three trigger types:
* **Student Incident** — the workflow fires when a student incident is created
* **Staff Incident** — the workflow fires when a staff incident is created
* **Incident Event** — the workflow fires when an [event](/docs/events/overview) is added to an incident
You then refine the trigger with:
* **Include linked students** — whether criteria should also match students linked to the incident (not just the main students)
* **Criteria** — optional conditions that narrow when the trigger fires
### Trigger criteria
Within a single trigger, criteria work together to precisely target the incidents you care about:
* Criteria of the **same type** are combined with **OR** — e.g. category "Physical" OR "Emotional"
* Criteria of **different types** are combined with **AND** — e.g. category "Physical" AND student group "Year 7"
* **No criteria** means the trigger matches all incidents of the specified type
The criteria you can set depend on the trigger type you chose:
| Criteria | Description | Available on |
| ----------------- | ----------------------------------------------------------- | -------------------------------- |
| **Category** | The type of concern (e.g. Physical, Neglect, Online Safety) | Student Incident, Staff Incident |
| **Student** | A specific student | Student Incident, Staff Incident |
| **Student Group** | A group of students (e.g. Children in Care, Year 7) | Student Incident, Staff Incident |
| **Location** | Where the incident occurred | Student Incident, Staff Incident |
| **Academic Year** | The student's academic year | Student Incident, Staff Incident |
| **SEN Status** | The student's special educational needs status | Student Incident, Staff Incident |
| **Pupil Premium** | Whether the student receives pupil premium | Student Incident, Staff Incident |
| **Event Type** | The type of [event](/docs/events/overview) being added | Incident Event |
On an **Incident Event** trigger, **Event Types** are the only criteria you can set. On the other two trigger types, student-specific criteria (student groups, SEN status, pupil premium, academic year) are only evaluated for student incidents.
## Actions
You need to be a **Deputy DSL** or above to create, edit, or delete workflows.
## How workflows work
Each workflow has two parts:
1. **Trigger** — the condition that determines when the workflow fires
2. **Actions** — what happens when the trigger matches
When a new incident is created, Signal evaluates all enabled workflows. If an incident matches a workflow's trigger criteria, the workflow's actions run automatically. This happens every time an incident is saved — you do not need to take any action to start the process.
## Trigger
Each workflow has a single **Trigger**. You pick one of three trigger types:
* **Student Incident** — the workflow fires when a student incident is created
* **Staff Incident** — the workflow fires when a staff incident is created
* **Incident Event** — the workflow fires when an [event](/docs/events/overview) is added to an incident
You then refine the trigger with:
* **Include linked students** — whether criteria should also match students linked to the incident (not just the main students)
* **Criteria** — optional conditions that narrow when the trigger fires
### Trigger criteria
Within a single trigger, criteria work together to precisely target the incidents you care about:
* Criteria of the **same type** are combined with **OR** — e.g. category "Physical" OR "Emotional"
* Criteria of **different types** are combined with **AND** — e.g. category "Physical" AND student group "Year 7"
* **No criteria** means the trigger matches all incidents of the specified type
The criteria you can set depend on the trigger type you chose:
| Criteria | Description | Available on |
| ----------------- | ----------------------------------------------------------- | -------------------------------- |
| **Category** | The type of concern (e.g. Physical, Neglect, Online Safety) | Student Incident, Staff Incident |
| **Student** | A specific student | Student Incident, Staff Incident |
| **Student Group** | A group of students (e.g. Children in Care, Year 7) | Student Incident, Staff Incident |
| **Location** | Where the incident occurred | Student Incident, Staff Incident |
| **Academic Year** | The student's academic year | Student Incident, Staff Incident |
| **SEN Status** | The student's special educational needs status | Student Incident, Staff Incident |
| **Pupil Premium** | Whether the student receives pupil premium | Student Incident, Staff Incident |
| **Event Type** | The type of [event](/docs/events/overview) being added | Incident Event |
On an **Incident Event** trigger, **Event Types** are the only criteria you can set. On the other two trigger types, student-specific criteria (student groups, SEN status, pupil premium, academic year) are only evaluated for student incidents.
## Actions
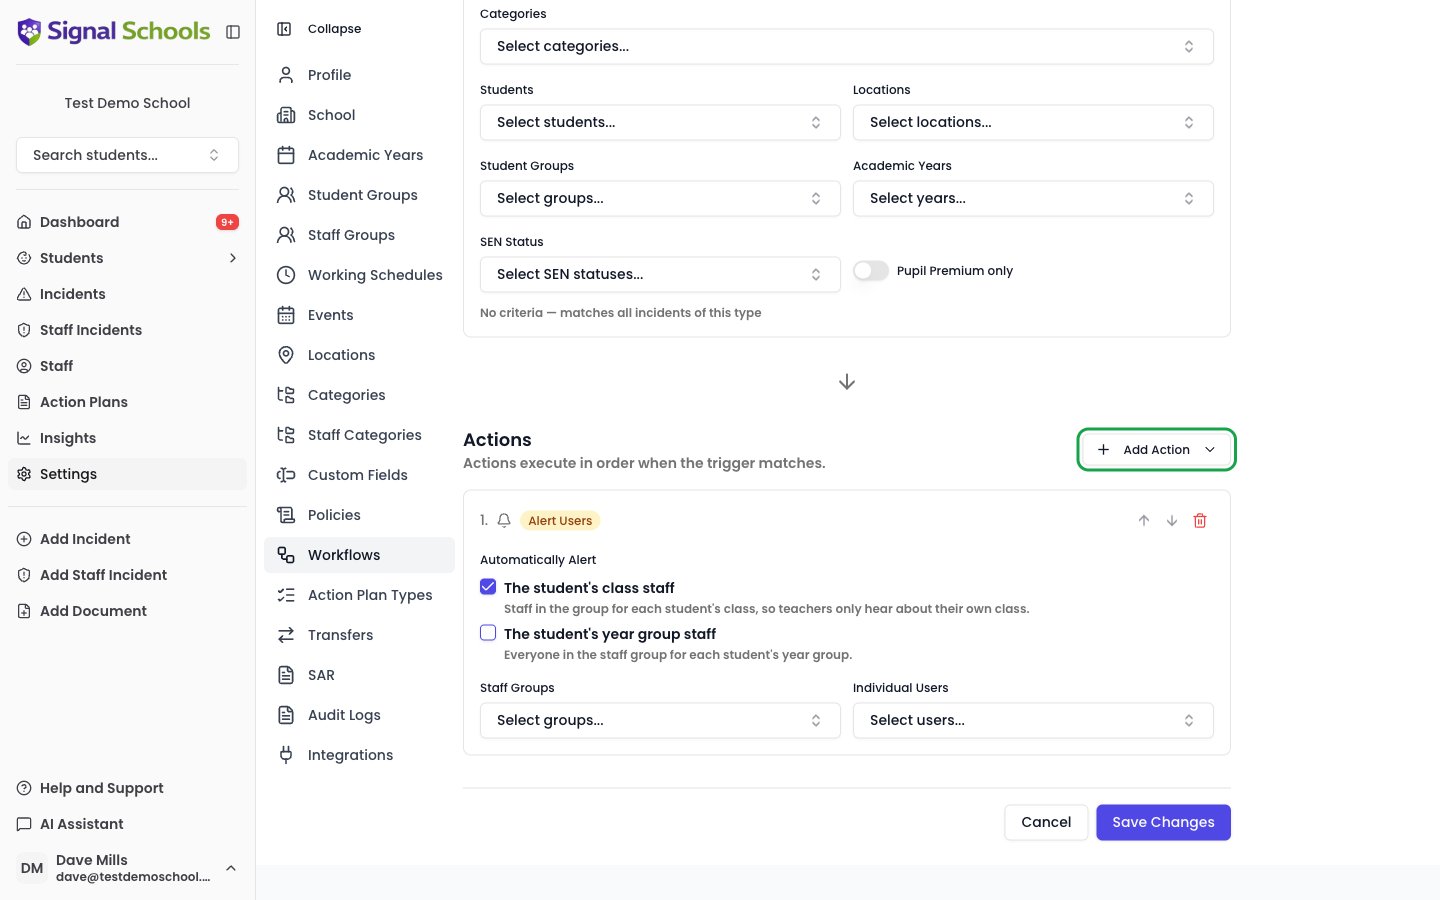 Each workflow can have one or more actions that run when the trigger matches. Add them from the **Add Action** dropdown. Which actions the dropdown offers depends on the trigger type:
* **Student Incident** — all five actions below
* **Staff Incident** — **Alert DSLs**, **Alert Users**, and **Apply Exclusions** only. Staff incidents have no parent emails and no reminders
* **Incident Event** — every action except **Apply Exclusions**
Automatically draft or send parent notification emails with customisable templates.
Notify all staff with the Owner, DSL, or Deputy DSL role when an incident is logged.
Notify specific staff members or Staff Groups when an incident is logged.
Restrict which staff can view the incident to protect sensitive cases.
Add a follow-up reminder to the incident, due a set number of days later.
## Creating a workflow
Open **Settings** from the sidebar and select **Workflows**.
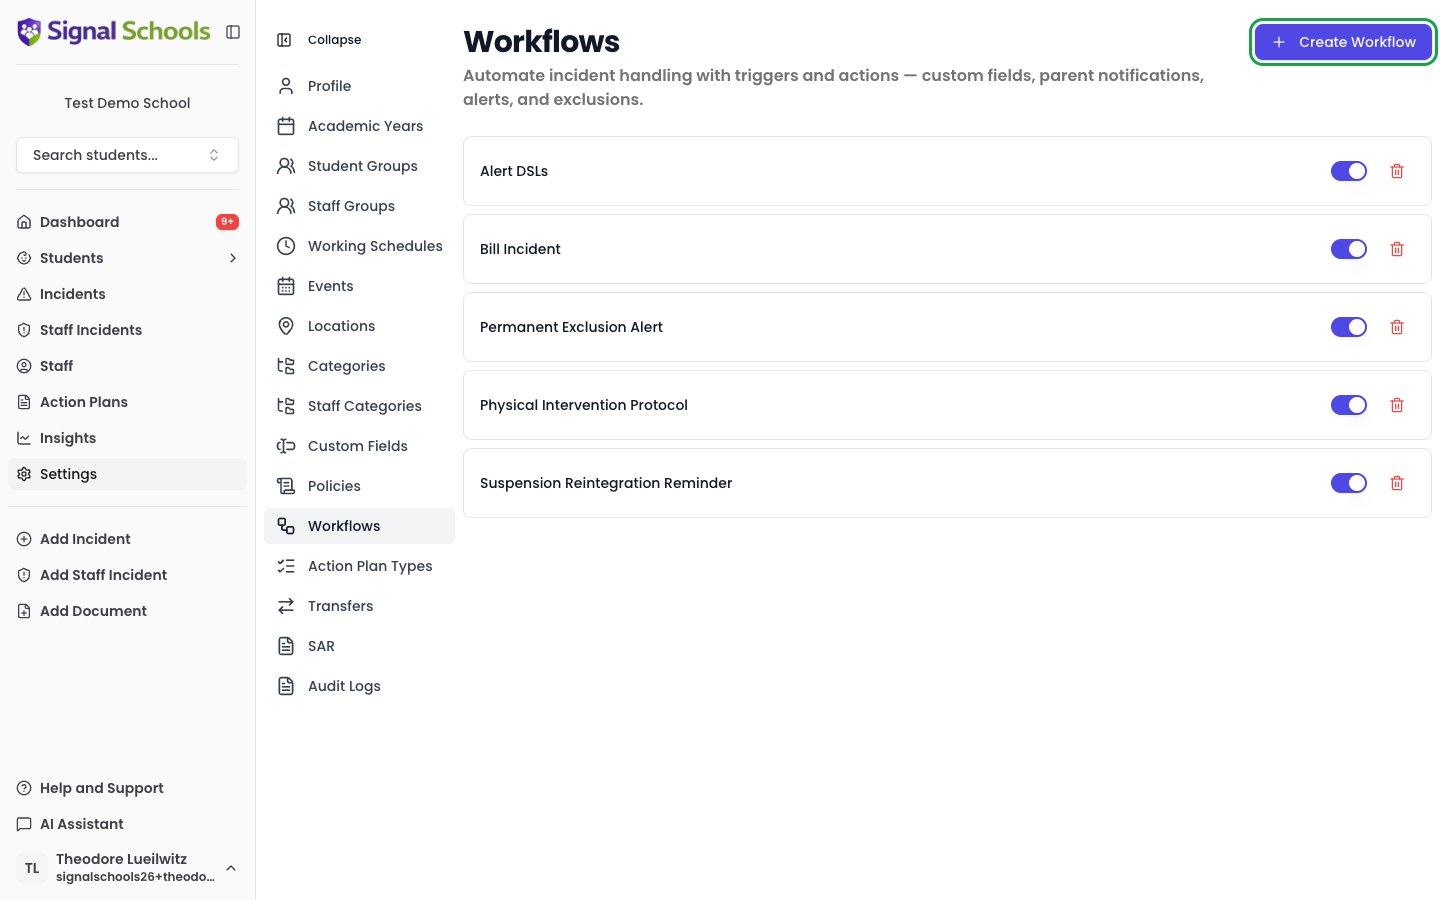
Click the **Create Workflow** button.
Give the workflow a clear name that describes its purpose — for example, "Physical Incident — Alert and Notify Parents".
In the **Trigger** section, choose one of **Student Incident**, **Staff Incident**, or **Incident Event**, then configure:
* Optionally enable **Include linked students**
* Add **criteria** to narrow when the trigger fires, or leave empty to match all incidents of that type
Open the **Add Action** dropdown and add one or more actions. The dropdown only offers the actions your trigger type supports:
Each workflow can have one or more actions that run when the trigger matches. Add them from the **Add Action** dropdown. Which actions the dropdown offers depends on the trigger type:
* **Student Incident** — all five actions below
* **Staff Incident** — **Alert DSLs**, **Alert Users**, and **Apply Exclusions** only. Staff incidents have no parent emails and no reminders
* **Incident Event** — every action except **Apply Exclusions**
Automatically draft or send parent notification emails with customisable templates.
Notify all staff with the Owner, DSL, or Deputy DSL role when an incident is logged.
Notify specific staff members or Staff Groups when an incident is logged.
Restrict which staff can view the incident to protect sensitive cases.
Add a follow-up reminder to the incident, due a set number of days later.
## Creating a workflow
Open **Settings** from the sidebar and select **Workflows**.
Click the **Create Workflow** button.
Give the workflow a clear name that describes its purpose — for example, "Physical Incident — Alert and Notify Parents".
In the **Trigger** section, choose one of **Student Incident**, **Staff Incident**, or **Incident Event**, then configure:
* Optionally enable **Include linked students**
* Add **criteria** to narrow when the trigger fires, or leave empty to match all incidents of that type
Open the **Add Action** dropdown and add one or more actions. The dropdown only offers the actions your trigger type supports:
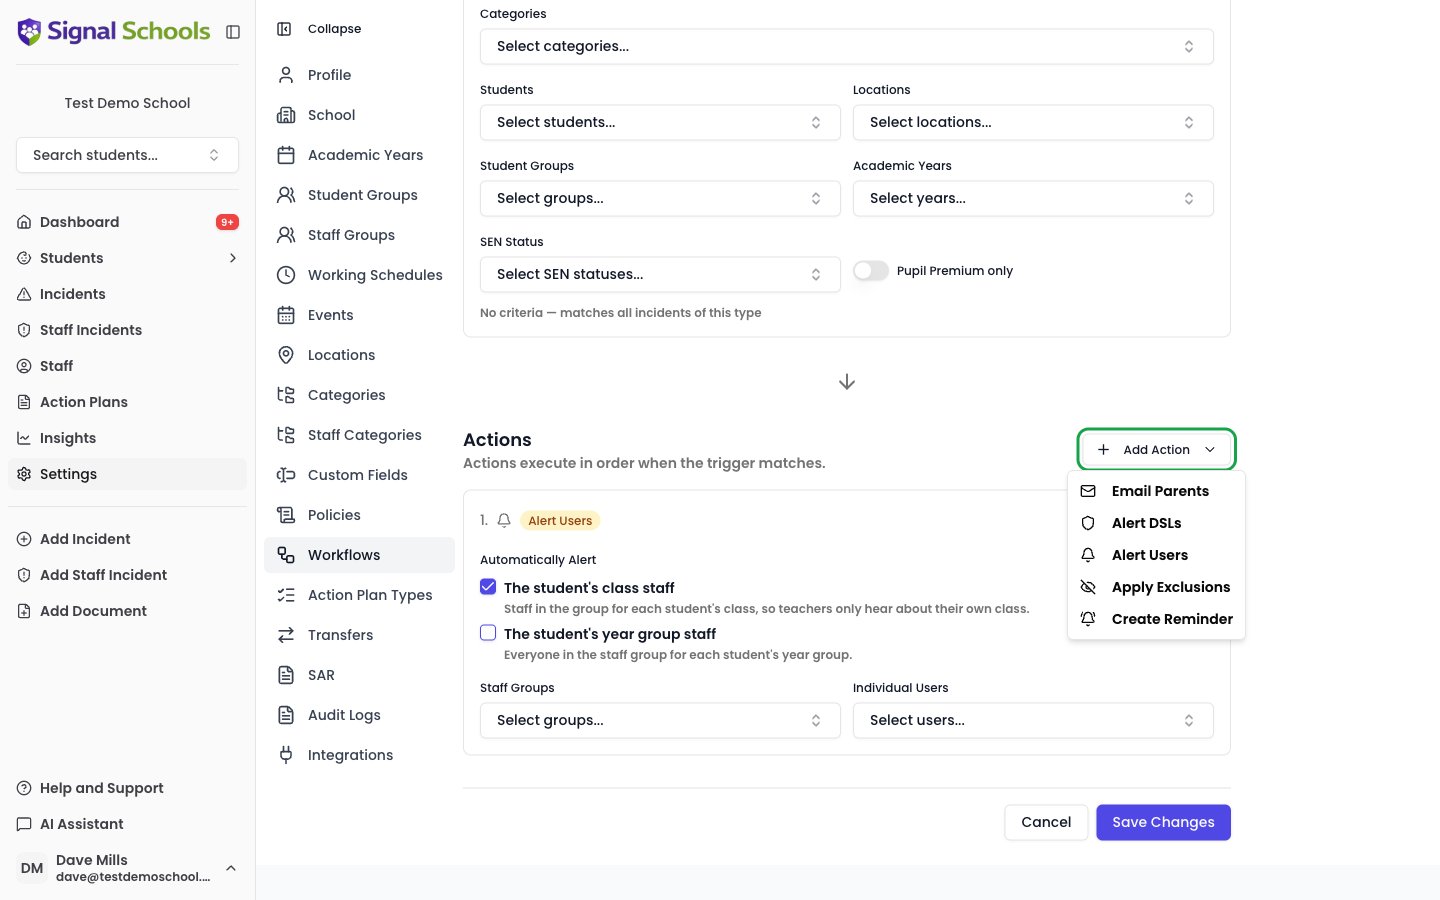 * **Email Parents** — write your email subject and body using placeholders, choose whether review is required
* **Alert DSLs** — alert all staff with the Owner, DSL, or Deputy DSL role
* **Alert Users** — select specific staff members or Staff Groups to alert
* **Apply Exclusions** — restrict viewing to DSL staff only, or select specific staff or Staff Groups to exclude
* **Create Reminder** — set a description, how many days until it is due, and who it is assigned to
Click **Create Workflow** to activate it. Alerts, emails, and reminders take effect for new incidents from this point on. Apply Exclusions restrictions also apply to existing incidents that match the trigger.
## Managing workflows
### Enabling and disabling
Each workflow has an **Enabled** toggle on its detail page. Disabling a workflow stops it from running without deleting it. Re-enable it at any time to resume automated processing.
The **Enabled** toggle on the workflow list only shows a reminder to use the detail page — open the workflow to change whether it is enabled.
### Editing
Click on any workflow from the list to open it for editing. Changes to the trigger, actions, or configuration take effect immediately for new incidents. Click **Save Changes** to apply your edits.
### Deleting
On the **Workflows** list, click the trash icon on a workflow's row to permanently remove it. Any notifications or restrictions already created by the workflow are not affected.
## Learn more
How staff alerts work, where they appear, and how to manage them.
Template placeholders, custom fields, and the review process for parent notifications.
Automatically restrict incident visibility for sensitive cases — applies to existing incidents as well as new ones.
Automatically add follow-up reminders when an incident matches.
* **Email Parents** — write your email subject and body using placeholders, choose whether review is required
* **Alert DSLs** — alert all staff with the Owner, DSL, or Deputy DSL role
* **Alert Users** — select specific staff members or Staff Groups to alert
* **Apply Exclusions** — restrict viewing to DSL staff only, or select specific staff or Staff Groups to exclude
* **Create Reminder** — set a description, how many days until it is due, and who it is assigned to
Click **Create Workflow** to activate it. Alerts, emails, and reminders take effect for new incidents from this point on. Apply Exclusions restrictions also apply to existing incidents that match the trigger.
## Managing workflows
### Enabling and disabling
Each workflow has an **Enabled** toggle on its detail page. Disabling a workflow stops it from running without deleting it. Re-enable it at any time to resume automated processing.
The **Enabled** toggle on the workflow list only shows a reminder to use the detail page — open the workflow to change whether it is enabled.
### Editing
Click on any workflow from the list to open it for editing. Changes to the trigger, actions, or configuration take effect immediately for new incidents. Click **Save Changes** to apply your edits.
### Deleting
On the **Workflows** list, click the trash icon on a workflow's row to permanently remove it. Any notifications or restrictions already created by the workflow are not affected.
## Learn more
How staff alerts work, where they appear, and how to manage them.
Template placeholders, custom fields, and the review process for parent notifications.
Automatically restrict incident visibility for sensitive cases — applies to existing incidents as well as new ones.
Automatically add follow-up reminders when an incident matches.