
Any member of staff can create a staff incident. Viewing, editing, and managing them afterwards requires Deputy DSL or above.
Creating a staff incident
1
Start a new staff incident
Click Add Staff Incident from the quick action in the sidebar, or navigate to Staff Incidents and select the Add Staff Incident button.
2
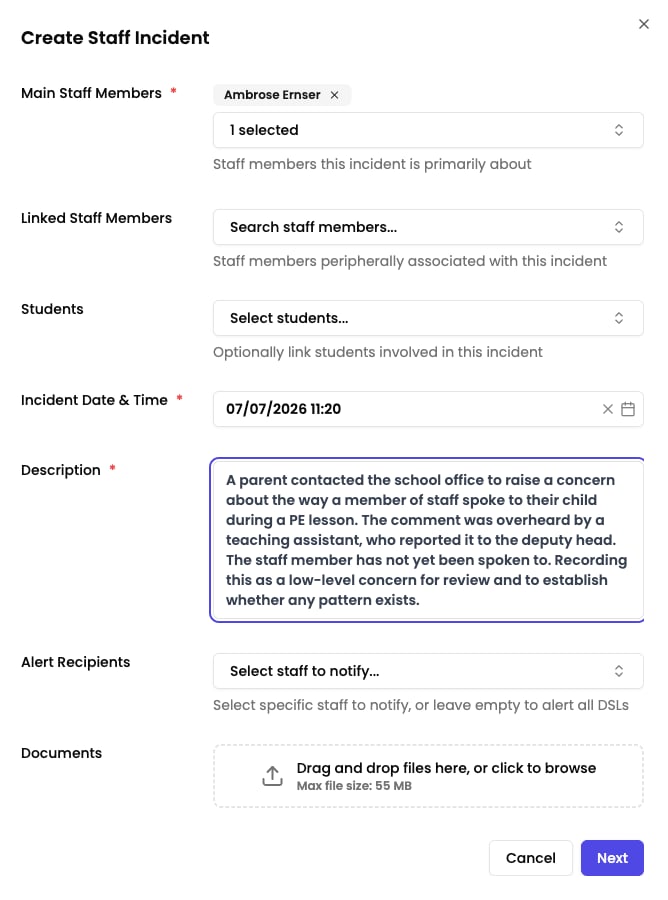
Select Main Staff Members
In the Main Staff Members field, choose the staff member or members the concern is about. At least one main staff member is required.
3
Add Linked Staff Members (optional)
If other staff members are connected to the concern but are not the primary subject, add them in the Linked Staff Members field.
4
Add Students (optional)
If any students are connected to the concern, add them in the Students field.
5
Set the date and time
Enter the date and time the concern arose. This may differ from the date you are recording the incident.
6
Write the description
Describe the concern in the rich text editor. You can use @mentions to tag relevant colleagues — staff who are named in the incident are automatically excluded from the mention list to protect confidentiality.
7
Select alert recipients
Choose who should be notified about this incident. Only staff with the Owner, DSL, or Deputy DSL role will appear as options.
8
Attach documents (optional)
Upload any supporting files — photos, letters, reports, or other evidence.
9
Submit for analysis
Click Next. Signal’s AI analyses the description and suggests both appropriate categories and the location.
10
Select categories and location
Review the AI’s suggested categories and location. Confirm the ones that apply, or change them if they do not fit.
11
Save the incident
Click Save to create the completed incident record.
Viewing and filtering staff incidents
The staff incidents list shows all incidents you have access to. Remember that any incidents naming you are automatically hidden due to self-exclusion. You can filter the list by:- Search — match keywords in the incident, including text inside attached documents
- Date range — focus on a specific time period
- Categories — show only incidents of a particular type
- Locations — filter by where the incident occurred
- Staff members — find incidents involving a specific person
Searching reads attached files as well as the incident’s own text, so a staff incident can match on a word that appears only in an attached letter. This matters for allegations in particular: a LADO response or local authority letter is normally filed as received rather than retyped, and would otherwise be invisible to search. See Document Analysis.
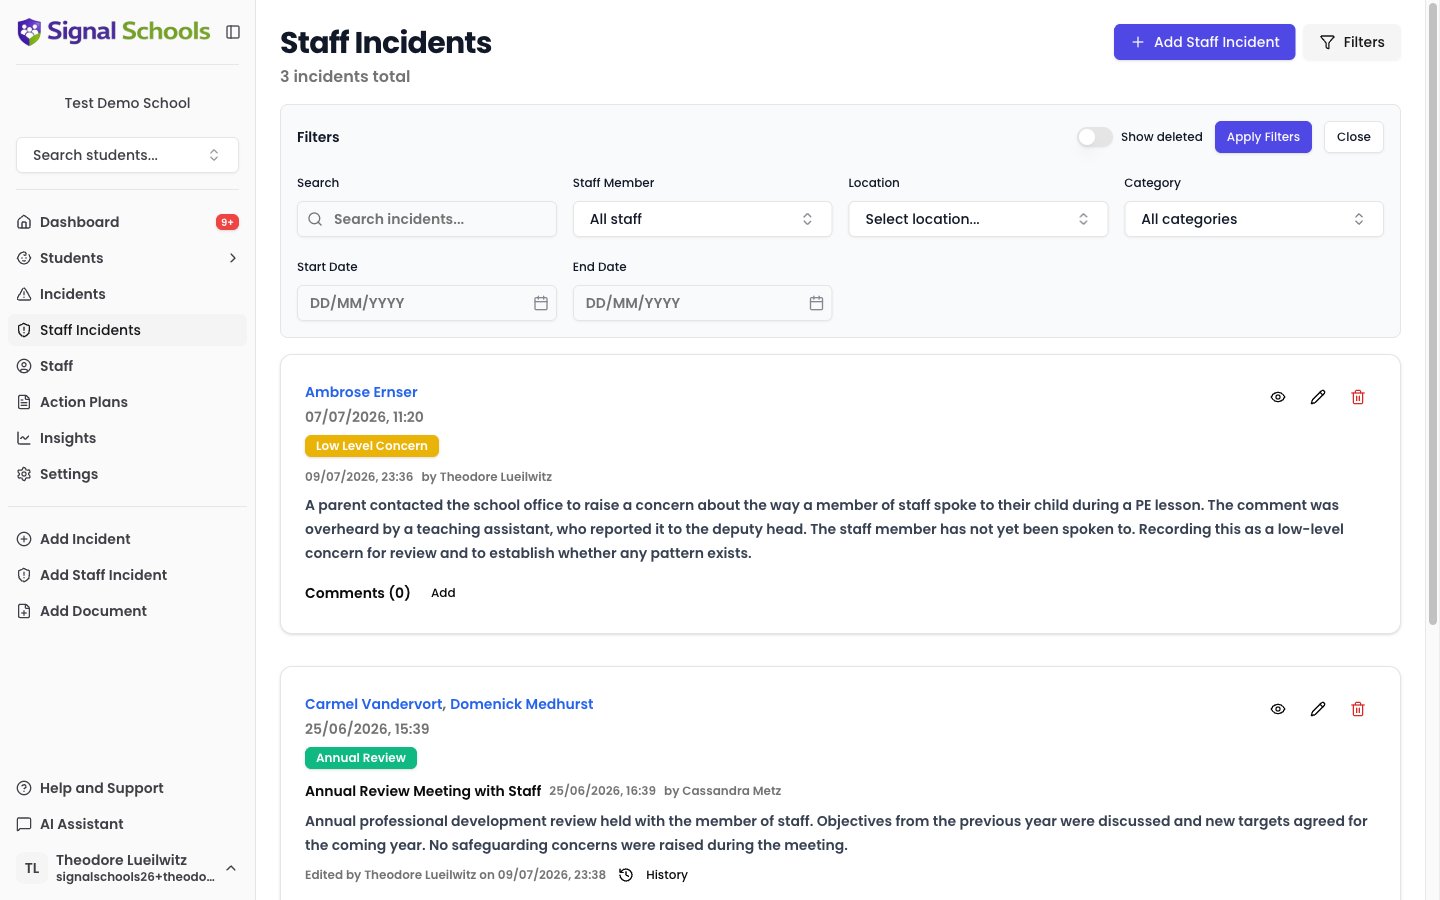
Filters can be combined. For example, you can view all “Allegations” incidents from the last term that occurred on the school premises.
Editing a staff incident
You can edit a staff incident after it has been created to add information, correct details, or update categories.1
Open the incident
Click an incident in the staff incidents list to open it. Staff incidents open in a side sheet titled “Incident Details” rather than a full page.
2
Start editing
On desktop, click the pencil icon (its tooltip reads “Edit Incident”). On mobile, open the menu and choose Edit.
3
Make your changes
Update any fields as needed — description, categories, location, linked staff, or linked students.
4
Save
Click Save to apply your changes.
Comments and collaboration
Comments allow Owners, DSLs, and Deputy DSLs to share updates, discuss next steps, and build a documented trail of actions taken on a staff incident.Adding a comment
1
Open the incident
Navigate to the staff incident you want to comment on.
2
Open the comments section
Comments are in a collapsible section within the incident side sheet. Use the Show / Hide / Add toggle to expand it.
3
Write your comment
Type your comment in the text field. You can @mention other Owners, DSLs, or Deputy DSLs to bring the incident to their attention.
4
Send
Click Send to post your comment.
Deleting a comment
You can delete a comment if you are the person who created it, or if you hold a privileged role (DSL, Deputy DSL, or Owner).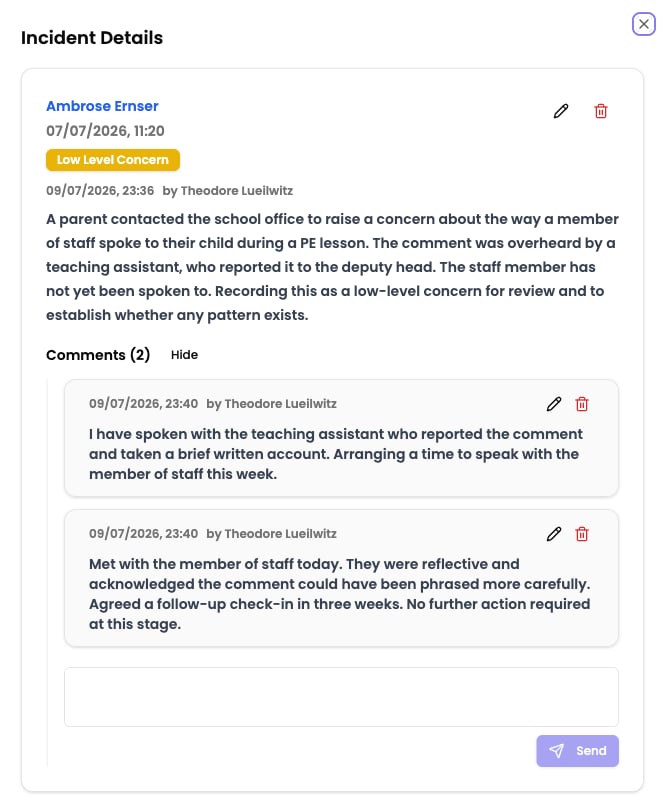
Key differences from student incidents
Staff incidents work similarly to student incidents in many ways, but there are some important differences:No agencies field
No agencies field
Staff incidents do not include an agencies field. External organisations involved in staff matters are typically referenced in the description or comments instead.
No AI recommendations panel
No AI recommendations panel
Unlike student incidents, staff incidents do not display an AI recommendations panel. AI is used to suggest categories during creation, but ongoing recommendations are not shown.
Restricted visibility
Restricted visibility
Anyone can record a staff incident, but only staff with Deputy DSL or above can see one afterwards, and self-exclusion applies on top of that. Student incidents, by contrast, remain visible to the staff who record them.